This Publish option can be used to copy a link to your published report: either the URL or JavaScript wrap, in order to provide access to the report outside of Heurist. Access will be based on user database access permissions and the permissions you have set for each record. This option also allows you to create report schedules.
To publish a report
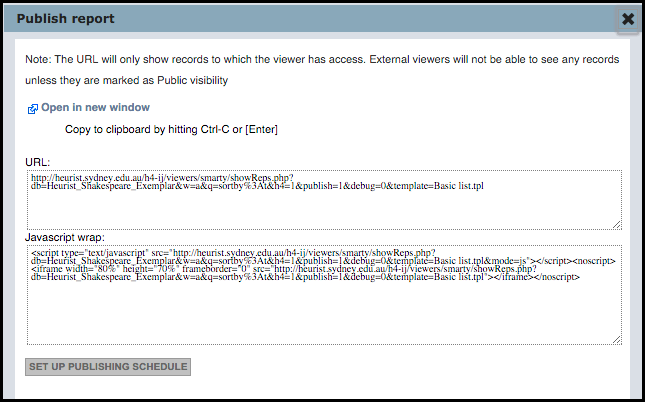
Use the Open in new window option to preview the published report in a separate browser window (i.e. opens the URL as shown in the URL box).
Use the Set Up Publishing Schedule button to set up a call for writing reports to file (HTML and JS), to be run on demand or based on a user-defined schedule. (see Schedule Reports below).
Scheduled Reports
Use this function to set up a call for writing reports to file (HTML and JS). Reports can be run on demand or based on a user-defined schedule.
Note: This function is also accessed through the Publish entry in the Report View menu.
To write a report

This shows any existing reports.
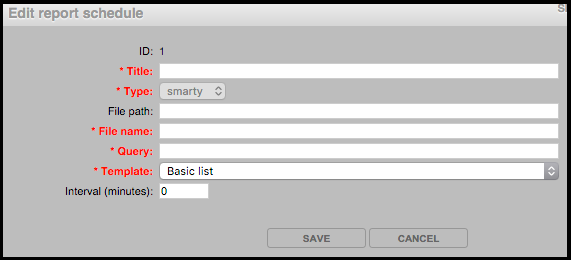
Id |
This identifies the published report and will be generated when the report is published. |
Title |
The title of the generated report. |
Type |
Select the type of report (i.e. the report syntax used). Note. Currently only Smarty reports are supported (see here). |
File Path |
The file path where the report is generated to. Leave blank to use the default path which is: datbasename/generated-reports |
File Name |
The base name of the report files. This will be completed with file types. |
Query |
The Heurist query you used as a base for the report. This is required since the reports are generated dynamically, using the current set of records. |
Template |
The name of the template used to generate this report (defaults to current template). |
Interval |
To schedule a report to be run regularly, specify the interval in minutes between regenerations of the report output. The default is zero (only run on demand.) Leave blank for no schedule. |
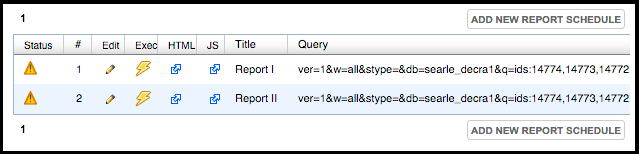
Note. The Status column indicates whether the report has been run yet.
The URLs of the generated files are shown in the HTML and JS columns. Copy these to show the report as a web page or in an iframe (HTML) or embed the report in your web page (JS). Click on a link to view additional details.
Created with the Personal Edition of HelpNDoc: Benefits of a Help Authoring Tool