Delimited Text (csv, tsv)
Database | Import | Delimited Text
This import facility lets you import delimited text files:
- CSV (comma separated values) file. Stores tabular data (numbers and text) in plain text. Each row of the file become a data record, while each comma-separated entry becomes a field.
- TSV (tab separated values) file. Stores tabular data in columns and rows (as in a worksheet). Rows and columns are imported into records and fields.
The entries in the file are matched against entries in the database; unmatched rows can be added as new records.
The import process handles the following types of scenarios:
- Pointer fields. Splits-out data into new record types linked with a pointer field (e.g. pulls out Authors or Place Names which are repeated for many records in the input data).
- Multi-values. Manages multiple values in a column, multi-line text columns and handles imbalanced quotes and other typical CSV/TSV issues.
- Misformatted data. Detects and reports line numbers for incorrectly formatted data to assist in correction. It can handle a wide variety of separators, long multi-line text fields with <CR> characters within fields, single quotes within double quotes and vice versa.
- Geographic Data. Geographic data is accepted in WKT (Well Known Format); for example: POINT(x y). See here for more details.
- Repeatable Fields. Multiple values for a repeatable field can be specified by separating the values with a | (pipe) symbol within the field. For example: 1,2,"3|4",5
- Normalisation. In order to normalise the data (e.g. to extract a list of persons (entities) as records and then point to these person records rather than including names repetitively in the main data records), start by importing only those fields relating to the entities to be normalised. After import, the data will be redisplayed with the ID numbers for the extracted records, which can be used as a pointer field in the subsequent import of the remaining columns of data. You needn't assign all the columns as unassigned columns will be ignored. Duplicated records will be treated as you specified.
- Disambiguation. When importing, Heurist tries to identify similar records which already exist in the database (a process known as disambiguation) and gives you the option of bookmarking one of these rather than making a new record.
Before You Begin
At a minimum, you must have a suitable record type structure defined in the database and a corresponding CSV/TSV file holding the entries you wish to transform into records.
Importing can be a complex business. It is important to clean up the data as much as possible in advance. The following provides some tips on how to prepare your data:
- We recommend breaking very large files into manageable blocks of about two thousand lines.
- Only one record type can be imported at a time.
- Have one row per entry, with each column containing a single element of data (split concatenated values into separate columns, and place notes about data items in a separate column, not appended to the data value).
- The first line MUST contain column labels. Do it for your own sanity! The first line of your data also determines the expected field count.
- Data rows must occupy a single line of data terminated with a linefeed: CRLF (Windows) or LF (Unix/Mac). Linefeeds within memo fields should be represented by CR only. Fields should be separated by tab or comma. Quotes may exist within unquoted fields, but within quoted fields they should be preceded by a backslash ( \" ). Fields containing the field separator should be enclosed in quotes. Editors such as Notepad++ (a free, open source Windows application) show tabs, CR and LF as symbols and can do global replacements on them.
- Coded columns should use a consistent set of codes. In addition to your spreadsheet program, you may find OpenRefine a useful tool for checking and correcting coded columns, splitting fields, georeferencing, finding URL references and so on.
- We strongly suggest editing the structure of the database to add any fields and terms that you will require for the import, before attempting to load the data. If you start trying to load data without the appropriate fields in place you will find it frustrating having to exit the process repeatedly to add fields.
- If you have missing data for Required fields, you may find it convenient to set those fields to Optional before importing, then set them back to Required, then use Database | Structure | Verify to get a list of the records which need correcting. Alternatively, you can add some dummy value to the data, such as 'Missing', and search for this value after import.
- The import process can be repeated on the file to extract multiple entities from different columns and replace them with record IDs which can be used in a subsequent insertion or update of records.
- Please visit the page on Importing delimited text files on the Heurist network site for tips on successful import.
Delimited Text Importer Wizard
The Import Wizard takes you through a number of screens and steps to assist you in defining the import. (Read the screen instructions carefully. It might be a good idea to carry out a trial import with a small dataset to check that the result is as you expected.)
Set Data Source
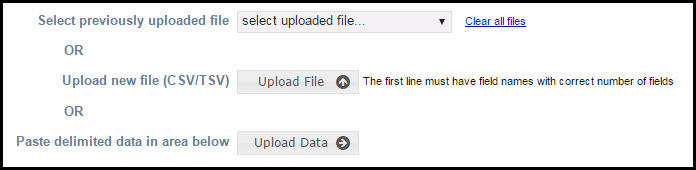
These options are:
- Select uploaded file. If you are importing a file you have imported before, select it from the dropdown. To clear this list, click Clear All files.
- Upload File. If you are importing a new file, select it using the Upload File button.
- Paste Data. If you wish to use copied delimited text, paste it in the box below and click Upload Data.
Set Import Parameters
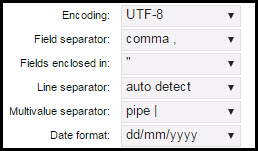
For CSV files, before carrying out the import, you can set the import parameters (these settings are saved) as follows:
- Encoding. Select the appropriate encoding.
- Field Separator. Select the appropriate field separator: Comma or Tab.
- Fields Enclosed In. Select the appropriate field enclosure: (', " or None).
- Line Separator. Leave as Auto-Detect or select the appropriate line separator: Windows, Unix or Mac.
- Multi-value separator. Select the appropriate multi-value separator: (e.g. | ; : /).
- Date Format. Select the appropriate date format: European (dd/mm/yyyy or US (mm/dd/yyyy). Other date formats are possible and will be handled in the following wizard dialog.)
Press Analyse Data to view parsed input and rectify if required.
Specify Identifier and Date Columns
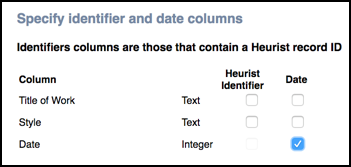
In this section you need to identify the following:
- Heurist Identifier. Select a field that holds the record ID (if available). Then select the relevant field (in your database).
- Date. Select any input column that contain dates (dd-mm-yyyy, mm-dd-yyyy or Iso standard) – this allows the data to be parsed to extract consistency formatted date fields.
Analyse Data
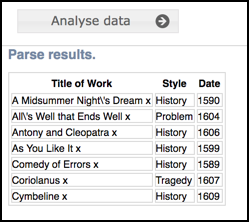
Click Analyse Data to parse the expected results. This checks that the structure of your data matches what the Import Wizard expects. The header of the upload CSV (the first line of your data determines the expected field count) is checked against your import parameters, column names are extracted and encoding verified. The Import Wizard then attempts to convert the file based on your settings and displays the result (the expected input as rows (records) and columns (fields)).
Review the result and any error messages and update the source data if required. Click Continue.
Select Primary Record Type and Dependencies
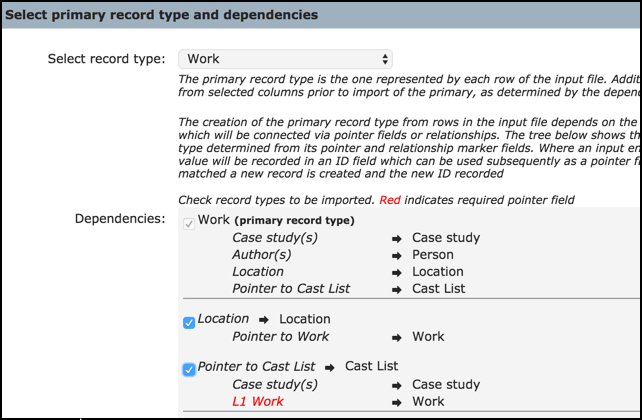
The primary record type is the one represented by each row of the input file. Additional record types may be imported from selected columns prior to import of the primary, as determined by the dependencies shown.
The creation of the primary record type from rows in the input file depends on the prior identification of other entities which will be connected via pointer fields or relationships. The tree below shows the dependencies of the primary record type determined from its pointer and relationship marker fields. Where an input entity matches an existing record, its ID value will be recorded in an ID field which can be used subsequently as a pointer field value; where no existing record is matched a new record is created and the new ID recorded. Check record types to be imported. Red indicates required pointer field.
Import Records from CSV/TSV
This page takes you through a series of steps, to correctly match and prepare your data for import:
Step 1. Matching
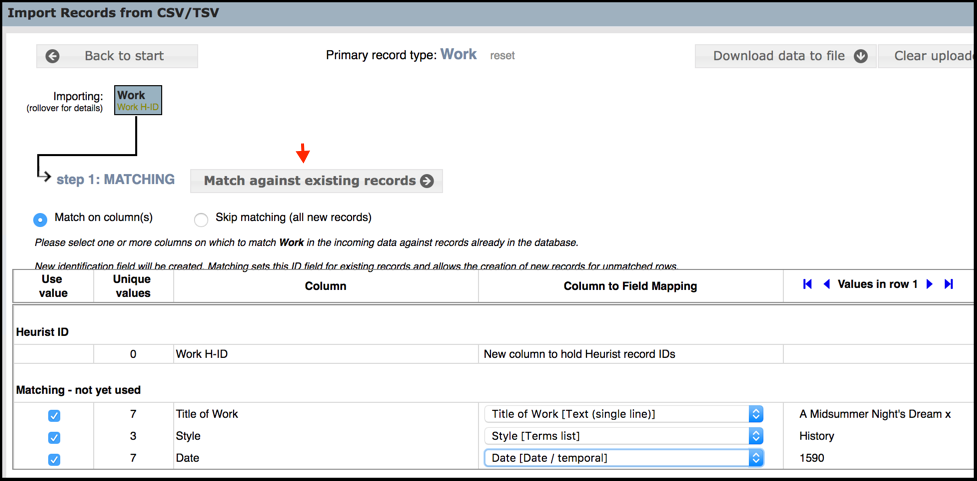
In the first step you can choose what to match or to skip matching. Select a radio button:
- Match on Columns. To match import rows against existing records, select at least one Matching key column (later you can select for mapping) and ensure all selected key columns are allocated to a field. You can check (and scroll through) a sample of the field data to be mapped in the Values column. A new identification field will be created. Matching sets this ID field for existing records and allows the creation of new records for unmatched rows.
- Use Heurist ID column. (Only if record has ID field.) The existing identification field ID will be used.
- Skip Matching (all new records). Skips the matching step (in this case only new records are created, one per input row).
Select the Match on Columns / Skip Matching button (depending on selection). Matches are shown.
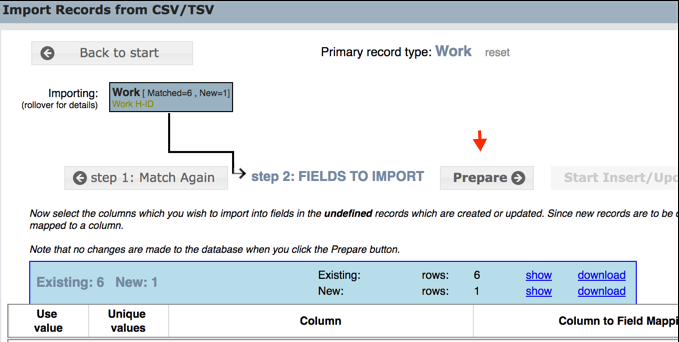
Step 2. Fields to Import
Note. If all existing rows already match existing records (e.g. you may have already carried out the import successfully), then you can select the displayed Skip Update button to cancel the import:

The Import Summary box shows a mapping summary:
- Existing. Number of matching records (that already exist based on selected matching columns). These will therefore be skipped.
- New. Number of input rows for which no matching record has been found. These will therefore be added.
The following options are for matched or new rows:
- Show. This displays the records on screen (click the Close (x) button).
- Download. This downloads the records to a CSV text file.
Note the following:
- If the spreadsheet data is complex, this page will allow you to progressively import columns which identify subsidiary entities (record types) such as place, organisation, collection, series, artist etc. The first step is to match key fields and create new records from unmatched rows. This will create a new column ending in ID. This can be used as the key field to import additional columns. Once all subsidiary entities have been matched and imported, you can import the primary entity type represented by the table.
- Record IDs for the imported columns are added as column 1. Copy and save these data immediately if there are additional fields to import, to allow use of the record IDs as record pointers. Warning: you will lose the record IDs as soon as you start over, so save the data below to a file first.
- If the displayed results are not what you expected, then go through the steps again (go back a step or click Back to Start if you wish to start again; all of your settings will be lost) and make any adjustments (including adjustments to the CSV or TSV file and/or Record Type).
Complete the Column to Field Mapping. Since new records are to be created, make sure you select all relevant columns; all Required fields must be mapped to a column.
Click Prepare when ready (importing does not happen yet).
Note. A message will appear if haven't selected any fields other than the ones which are used to match records, so those are the only fields which will be set, and the result may be incomplete records. Click Proceed if you wish to continue, otherwise Cancel and review your settings.

Step 3. Insert/Update
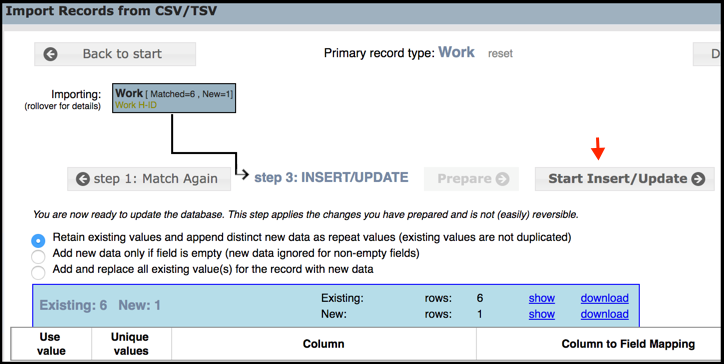
In this step you carry out the update (this will update the database based on your settings so be sure this is what you wish to do).
Select an option on how you wish to treat data that already exists in a field:
- Retain existing values and append distinct new data as repeat values (existing values are not duplicated)
- Add new data only if field is empty (new data ignored for non-empty fields)
- Add and replace all existing value(s) for the record with new data
If you are happy to proceed with the import, click Start Inset/Update. You will be notified of the updates:
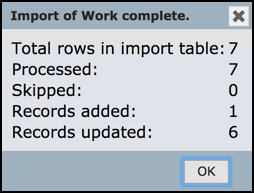
Click OK and close the window to exit the Import wizard. Review the imported records.
Created with the Personal Edition of HelpNDoc: Free Web Help generator