Before defining a new record type definition, check whether a similar record type already exists in the database structure, which can be reused or tailored. Also consider whether a record type definition can be imported from the Heurist Index (see Templates). The reuse of database record types can save time and add to the overall constancy of databases.
From the Record Type and Field Definitions screen, click the New Record Type / Fields button and complete the record type description, as follows:
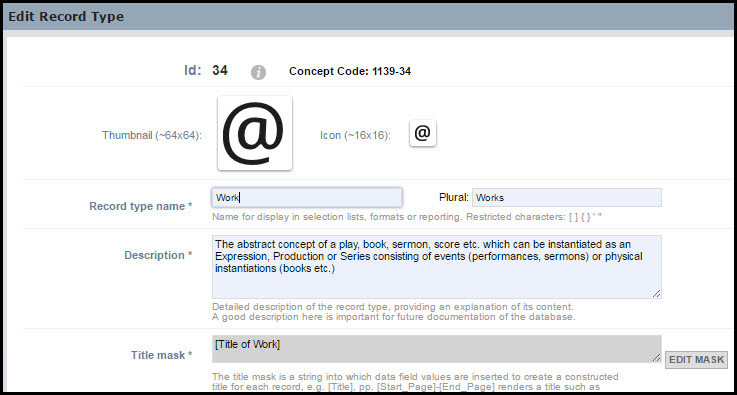
Id |
A unique record ID is automatically assigned when you save the record type. |
Thumbnail and Icon |
Associates a thumbnail and icon image with the record type. (See Adding a Thumbnail & Icon below). |
Record Type Name |
Enter a name for the record type. The Plural is automatically created; change this if required (e.g. 'Mices' to 'Mice'.) Note: For record type and field type names, the following symbols are allowed: a-zA-Z0-9$_<> /,–— The last two symbols are n-dash (150) and m-dash (151). Minus and hyphen symbols are not allowed. |
Description |
Enter a short, suitable description, for both your own use and to assist other users of the database (this displays when the user rolls the cursor over the record). |
Title Mask |
This field only becomes available once a record type is saved. You must enter a valid title mask once the record type has been created. (See Constructing a Title Mask below.) Title masks allow you to define composite titles that can be constructed dynamically from field values. The fields are populated on-the-fly when the record is generated. For example: [Title], pp. [Start_Page]-[End_Page] renders the Title field and Start Page and End Page fields as (for example): Alice in Wonderland, pp. 37-39. |
Semantic/Reference URL |
Enter an (optional) URL to a full description or ontological reference definition of the record type. |
Show Record URL on edit form |
Select this checkbox to display a URL to any record of this record type at the top of the Edit screen (in Advanced mode). |
Display Group |
Select the group the record type is to belong to. You can change this group at any time. |
Status |
This can be:
|
Show in Lists |
Select this checkbox to make the record type available to the user (e.g. in dropdown menus) or to temporally hide the record type. |
Show Description on edit form |
Select this checkbox to display a record type description to any record of this record type at the top of the Edit screen (in Advanced mode). For example:
|
When complete, click Next to save your edits; this closes the screen and opens the Record Structure page, where you can select or define the fields for the record type. (See Manage Types / Fields.)

All record types must have a thumbnail (and icon) associated with them. The thumbnail (64x64px) is an image identifying the record type in various places within Heurist. The icon is simply a smaller version of the thumbnail (16x16px). You must choose a thumbnail; selection of the thumbnail also selects the corresponding icon.
To select an image, click on the Thumbnail placeholder (on the Edit Record Type screen). To choose from the displayed set of default images, click the image. Alternatively, to select an image from your computer/network, click Choose File for both thumbnail and icon and choose suitable images (viewable at the displayed sizes: thumbnails are scaled to 64x64px, icons to 16x16px).
When you click Close Window, the picture is inserted into the Thumbnail and Icon fields.
Once you have saved the record type, you can edit the thumbnail and Icon images via the Edit Record Type page (click on image to edit)

Manage | Structure | Record Types / Fields | Edit Icon | Edit Mask option
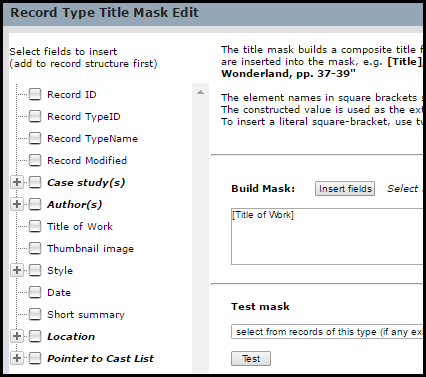
Once you create a new record type you must construct a valid title mask. Title masks provide the ability to build a composite record title based on information taken from other fields in the record, on the fly. The title mask is a string into which field values are inserted to create the title. The constructed value is used as the extended title displayed in search results and other lists.
You can add or update the title mask using the Edit Mask option on the Edit Record Type dialog, or from the link at the top of the Record Structure screen.
On the Title Mask Edit screen, position the cursor in the Build Mask field. Select the field(s) you wish to insert from the left hand column (this shows all available field markers in the current record, plus fields in records pointed to by this record) and click Insert Fields. You can repeat this step for each field or set of fields. To add additional text around the field markers, enter the text without square brackets in the appropriate location.
When ready, you can test the mask using actual data. From the Test Mask dropdown, select any record, then click Test to view the result:

Note. To verify all title masks, see Utilities | Verify Title Masks.
Fields in the record are indicated by square brackets. The element names in square brackets should match field names for this record type.
For example, a Person record might have the fields: Given Name(s), Family Name, Title. In this case you could create the following title mask:
[Family Name], [Given Name(s)] ([Title]
A person whose Family Name = 'Smith', Given Name(s) = 'John', Title = 'Dr' will be rendered in the Title field as:
Smith, John (Dr)
Other people will be rendered appropriately.
Fields in records that are referenced by the record through pointers can also be used. For example:
[personpointer].[Last name]
This pulls out a person's name from a person record pointed to by the current record.
Additional text or punctuation can also be included. For example:
[Title], pp. [Start_Page]-[End_Page]
This renders the Title field and Start and End Page fields as, for example:
Alice in Wonderland, pp. 37-39
To insert a literal square-bracket, use two consecutive square-brackets ([[ or ]]).
Fields in records referenced by the record through pointers can also be used:
[personpointer].[Last name]
Created with the Personal Edition of HelpNDoc: What is a Help Authoring tool?
