Custom Reports
The Custom Report view allows you to create, view and dynamically publish your digital research data as report outputs to an external audience. For example, generate teaching/research project web site content automatically.
Smarty Heurist reports are powered by the Smarty Template Engine. Reports are based on stored HTML templates, built up from regular HTML formatting along with Smarty formatting which together determine the formatting and structure of the displayed data and the different actions based on record fields and terms. In addition, advanced users can create and save new templates using the Smarty syntax assisted editor, or external editor. See Smarty Syntax.
Simple templates can produce neatly formatted lists in text (e.g. CSV and MTML formats), including media (e.g. images and videos). For example, a report might extract and display the first and last names of all writers born before 1900 along with an alphabetical list of their works. More complex formats can use all the power of the Smarty template language, including PHP functions (standard or user-defined) directly within the template.
Controls for creating, managing and running reports are available from the Report toolbar:
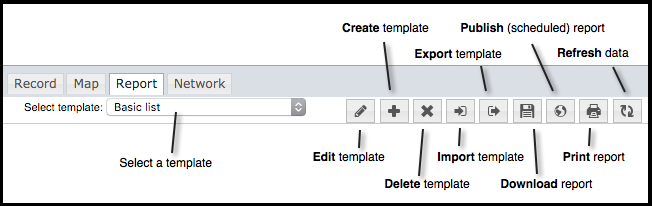
Use these buttons as follows:
- Select. Select an existing report from the drop down. This is immediately run against the current data set. This lets you test run the report against a set of queried records and view the report on-screen. (See Run Report below.)
- Edit. Edit the selected report template.
- Create. Create a new template using Smarty syntax. (See Create Report Template.)
- Delete. Deletes the current report template
- Import. Import a template exported from another database (as a GPL file). Import converts concept IDs to local IDs for that database.
- Export. Export a template as a GPL file (this can then be imported to another database). Export converts field IDs to concept IDs.
- Download. Saves the current report output as a HTML file.
- Publish. Publish the report to an external web site (i.e. copy a link (URL or JavaScript wrap) to the report output). Optionally set up a publication schedules. (See Publish.)
- Print. Print the report output.
- Refresh. Use this to refresh the data used by the report template, if your database has been updated.
Run Report
Run a search query for the records you wish to use in your report. Select the Report View. From the Select Template dropdown, select the report you wish to run.
The report is displayed in the Report View pane.
To re-run the report with different search results, search again. The report will be updated automatically. Use the Refresh button  if data has changed.
Print Report 
Run the report (see above). Click Print . This displays the Print screen, showing the print settings and a preview of the report output according to these settings:
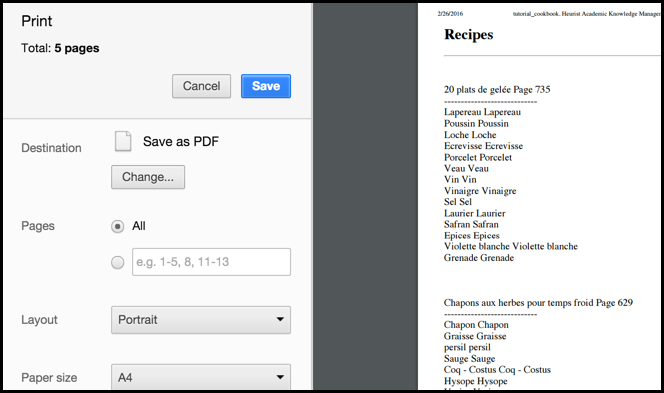
Review the report output in the Preview pane. You can scroll through the report pages and use the toolbar to move or resize the pages (for review purposes only). Complete the Print dialog settings as appropriate. If required, modify the report settings.
Note. Alternatively you can use your PC's Print dialog by selecting Print Using System Dialog.
The report preview updates accordingly. When ready, click Print.
Publish Report 
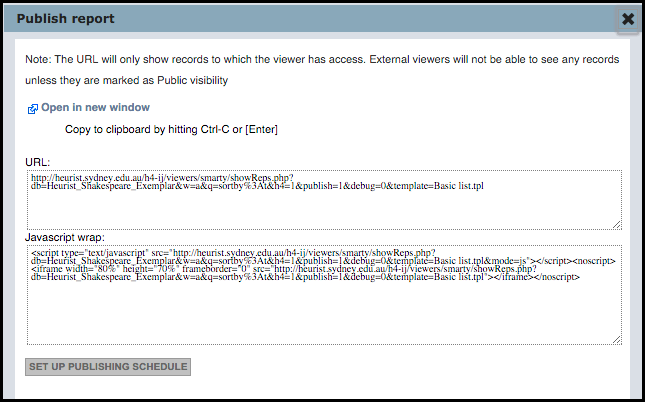
This Publish option can be used to copy a link to your published report: either the URL or JavaScript wrap, in order to provide access to the report outside of Heurist. Access will be based on user database access permissions and the permissions you have set for each record. This option also allows you to create report schedules.
To publish a report, run the report (see above). Select Publish . The Publish Report dialog displays. Use the Open in new window option to preview the published report in a separate browser window (i.e. opens the URL as shown in the URL box).
Copy one of the links (URL or Javascript Wrap), as required. Use the copied link as you wish (e.g. embed in web page to allow external viewers to view the report).
Scheduled Reports

Use the Set Up Publishing Schedule button to set up a call for writing reports to file (HTML and JS), to be run on demand or based on a user-defined schedule. (see Schedule Reports below).
To write a report, select Publish . Click Set Up Publishing Schedule button. The Scheduled Reports screen shows any existing reports. Click Add New Report Schedule:

Complete the Edit Reports Schedule report details, as follows:
ID |
This identifies the published report and will be generated when the report is published. |
Title |
The title of the generated report. |
Type |
Select the type of report (i.e. the report syntax used). Note. Currently only Smarty reports are supported. See Create Report Template. |
File Path |
The file path where the report is generated to. Leave blank to use the default path which is: datbasename/generated-reports |
File Name |
The base name of the report files. This will be completed with file types. |
Query |
The Heurist query you used as a base for the report. This is required since the reports are generated dynamically, using the current set of records. |
Template |
The name of the template used to generate this report (defaults to current template). |
Interval |
To schedule a report to be run regularly, specify the interval in minutes between regenerations of the report output. The default is zero (only run on demand). Leave blank for no schedule. |
When complete, click Save. Your report schedule will be added to the list of scheduled reports.
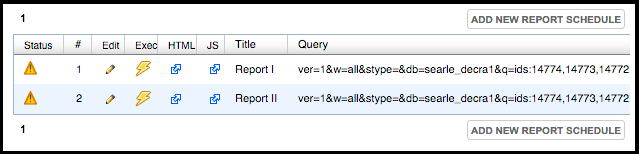
Note. The Status column indicates whether the report has been generated yet ( mean not generated yet).
To edit the report, click Edit  . To run the report, click Exec
  for that report. This updates the report file (specified in File Path & File Name).
The URLs of the generated files are shown in the HTML and JS columns  . Copy these to show the report as a web page or in an iframe (HTML) or embed the report in your web page (JS). Click on a link to view additional details.
Created with the Personal Edition of HelpNDoc: Free help authoring tool